
Stirling (Aldi) Portable AC Error Codes

 If you experience problems with your portable air conditioner, or it appears not to be operating correctly, check the information below for solutions to common problems. If none of the solutions offered help you solve your problem, please contact our after sales support centre for advice.

Stirling (Aldi) Portable Air Conditioner Error Codes-min
Error CodesPossible Causes
E0The room temperature sensor failed. Solution: Call for service to replace the room temperature sensor (the unit can also work without replacement).
E2Water full. Solution: Drain the water manually.

Problem: Low cooling performance

Possible Causes:

  1. Doors or windows to the room are open.
  2. There are heat sources inside the room.
  3. The exhaust air hose is not connected, or blocked.
  4. The temperature setting is too high.
  5. The air inlet is blocked.

Solution:

  1. Make sure all windows and doors to the room are closed.
  2. Remove the heat sources, if possible.
  3. Connect or clean the exhaust air hose.
  4. Reset the temperature.
  5. Clean the air inlet.

Problem: Noisy

Possible Causes:

  1. The ground is not level or not flat enough.
  2. The sound comes from the refrigerant flowing inside the air conditioner.

Solution:

  1. Make sure to place the unit on a flat, level ground.
  2. This is normal and no cause for concern.

Problem: Unit does not start when pressing the POWER button.

Possible Causes:

  1. The water full (WF) indicator blinks, indicating that the drip tray is full.
  2. The room temperature is lower than the set temperature.

Solution:

  1. Drain the condensation water manually.
  2. Reset the temperature.

Cleaning the Air Filters

This unit has four air intake filters: two at the back of the unit and two at the side. If the air filters clog up with dust, the airflow volume will be reduced. We recommend cleaning the filters once every two weeks. Each of the four air filters consist of two parts: the air inlet grille and the air filters underneath.

Stirling (Aldi) Portable Air Conditioner Cleaning the air filters-min
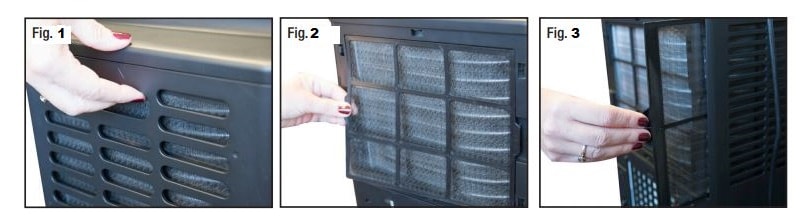
  1. First remove the filters at the back of the air conditioner. Place your fingers in the larger grille openings and pull to remove: first the grille (Fig. 1) and then the air filters (Fig. 2).
  2. With the back grilles removed, you can now grasp the small handle of the air filters at the side and slide them out for cleaning (Fig. 3).
  3. Clean all parts with a mild detergent in warm water (max. 40°C). Rinse thoroughly and let all parts dry completely in the shade before reinstallation.

Control Panel

Stirling (Aldi) Portable AC Control Panel-min
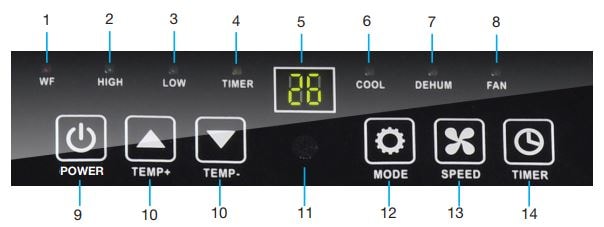
  1. WF: Water full indicator
  2. HIGH: High fan speed indicator
  3. LOW: Low fan speed indicator
  4. TIMER: Timer indicator
  5. Display screen
  6. COOL: Cooling mode indicator
  7. DEHUM: Dehumidifying mode indicator
  8. FAN: Fan mode indicator
  9. POWER: Press the power button to turn the unit on or off.
  10. TEMP + / – : Press to set the desired room temperature. With each press, the temperature setting will be increased or decreased by 1°C. These buttons can also be used to set the timer, in hours.
  11. Signal receiver: Aim the remote control at this sensor.
  12. MODE: Press repeatedly to select the desired mode of operation (cooling, dehumidifying or fan).
  13. SPEED: Press to choose high or low fan speed.
  14. TIMER: Press to set the time period (in hours) for automatic switch-on/ switch-off, or to delete the timer setting.

Stirling (Aldi) Portable Air Conditioner Manual PDF

Comments

Popular posts from this blog

Rittal Air Conditioner Error Codes

  System messages are shown on the display screen of the Comfort controller via the displays A1 to A20 and E0. Rittal Air Conditioner Error Codes Error Codes System message Possible cause A1 Enclosure door open Door open or door limit switch incorrectly positioned A2 Internal temperature of enclosure too high Cooling capacity inadequate/unit undersized. Error as a consequence of messages A03 to A17. A3 Filter monitoring Filter mat soiled A4 Ambient temperature too high/too low Ambient temperature outside of admissible operating range (+10°C to +60°C) A5 Icing hazard Operational display in case of icing hazard. A6 PSAH pressure-operated switch Ambient temperature too high A7 Evaporator coil Lack of coolant; sensor in front of or behind condenser defective. A8 Condensate warning Condensate discharge kinked or blocked A9 Condenser fan blocked or defective Blocked or defective A10 Evaporator fan blocked or defective Blocked or defective A11 Compressor Compressor overloaded A12 Condense...

Midea VRF Error Codes

  R410A All DC Inverter V4 Plus R Series 50/60Hz Error Codes: V4 VRF:  Advanced 3-pipe technology enables  heat recovery  between indoor units for unprecedented economy and performance. It can simultaneously operate in cooling and heating mode when it is necessary to provide more freedom for operation. It compensates and adjusts when there are hot and cold rooms in the same building, depending on the direction of sunshine. As a result, it reduces annual power consumption. Midea VRF Error Codes Error Codes Problem E0 Communication error between outdoor units. Only display on the faulty slave unit, all the ODUs are in standby. E1 Phase sequence error. Display on the faulty unit, all the ODUs are in standby. E2 Communication error between indoors and the master unit. Only display on the master unit, all the ODUs are in standby. E4 Outdoor ambient temperature sensor (T4) and condenser pipe temperature sensor (T3/T5) error. Display on the faulty unit, all the ODUs are in ...

LG VRF Error Codes – Multi V

  Error Codes; Indicate different types of unit failures, assist in self-diagnosis and to track the frequency of occurrence. Error codes are shown on the LED of indoor units, wired remote controller, the outdoor unit control board, and on the main screen of the LG Monitoring View (LGMV) Diagnostic Software. If two or more errors occur simultaneously, the lower error code number is displayed first. After error is resolved, the error code does not display. Error Display; The first, second, and third number on the LED indicates error number; the fourth number on LED indicates outdoor unit number. Examples: 211 = Error No. 21 on master unit, 213 = Error No. 21 on slave2 unit, Error No. 105 on master unit on compressor 1. Error Code Nomenclature Definitions; MICOM: Non-volatile memory chip where unit setup information is stored. EPROM: Non-volatile memory chip where device identification, size, and factory defined default component operating parameters are stored.   LG Multi V Erro...