Occasionally, a problem may arise that is minor in nature, and a service call may not be necessary. Use this troubleshooting guide for a possible solution.

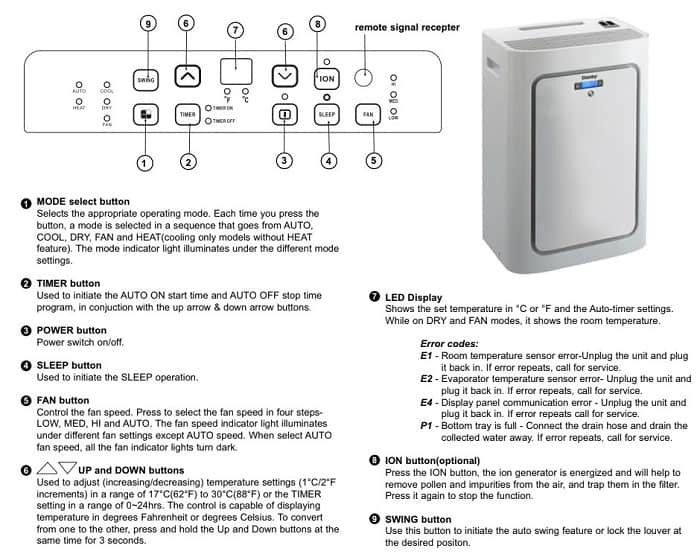
| Error Codes | Problem |
|---|---|
| E1 | Error with the coils temperature sensor. |
| E2 | Error with the indoor temperature sensor. |
| E4 | Frost protection: the temperature of the coil is too low and the A/C shuts down to prevent excess frost build-up. When the temperature increases to 8°C (46.4°F), the protective setting is released and the previous setting is applied. |
| Ft | Tank is full - Connect the drain hose and drain the collected water away. If error repeats, call for service. |
| P1 | Bottom tray is full - Connect the drain hose and drain the collected water away. If error repeats, call for service. |
| Lt | Low Temperature. The unit will defrost. The appliance will start again once defrosting is complete |
| PF | Probe failure, call for service |
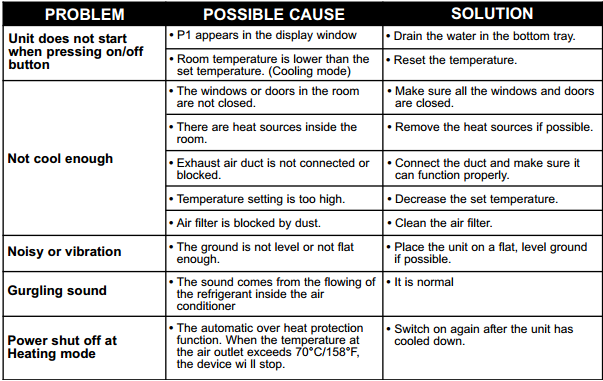
Danby Portable Air Conditioner Troubleshooting
Problem: Unit does not start when pressing on/off button
Possible Cause:
- P1 appears in the display window
- Room temperature is lower than the set temperature. (Cooling mode)
Solution:
- Drain the water in the bottom tray.
- Reset the temperature.
Problem: Not cool enough
Possible Cause:
- The windows or doors in the room are not closed.
- There are heat sources inside the room.
- Exhaust air duct is not connected or blocked.
- Temperature setting is too high.
- Air filter is blocked by dust.
Solution:
- Make sure all the windows and doors are closed.
- Remove the heat sources if possible.
- Connect the duct and make sure it can function properly.
- Decrease the set temperature.
- Clean the air filter.
Problem: Noisy or vibration
Possible Cause: The ground is not level or not flat enough.
Solution: Place the unit on a flat, level ground if possible.
Problem: Gurgling sound
Possible Cause: The sound comes from the flowing of the refrigerant inside the air conditioner
Solution: It is normal
Problem: Power shut off at Heating mode
Possible Cause: The automatic over heat protection function. When the temperature at the air outlet exceeds 70°C/158°F, the device wi ll stop.
Solution: Switch on again after the unit has cooled down.
WARNING
Be sure the electrical service is adequate for the model you have chosen. This information can be found on the serial plate, which is located on the side of the cabinet and behind the grille.
• Be sure the air conditioner is properly grounded. To minimize shock and fire hazards, proper grounding is important. The power cord is equipped with a three-prong grounding plug for protection against shock hazards.
• Your air conditioner must be used in a properly grounded wall receptacle. If the wall receptacle you intend to use is not adequately grounded or protected by a time delay fuse or circuit breaker, have a qualified electrician install the proper receptacle.
• Ensure the receptacle is accessible after the unit installation.
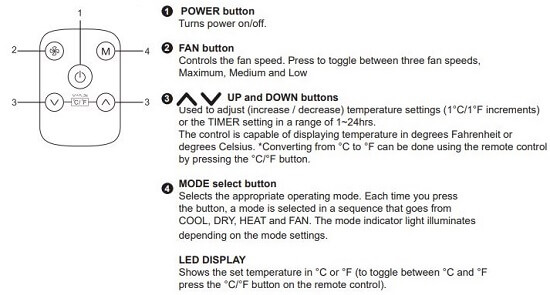
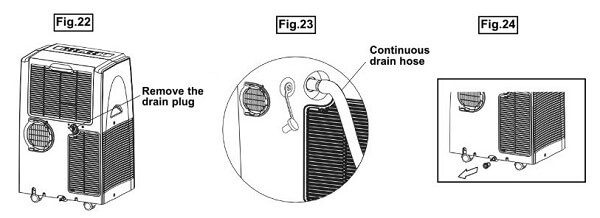
How to Fix P1 Error?
When the water level of the bottom tray reaches a predetermined level, the unit beeps 8 times, the digital display area shows P1. At this time the air conditioning/dehumidification process will immediately stop. However, the fan motor will continue to operate (this is normal). Carefully move the unit to a drain location, remove the bottom drain plug and let the water drain away (Fig.24). Restart the machine until the P1 symbol disappears. If the error repeats, call for service.
During dehumidifying modes, remove the drain plug from the back of the unit, install the drain connector (5/8” universal female connecter) with 3/4” hose (locally purchased). For the models without a drain connector, just attach the drain hose to the hole. Place the open end of the hose directly over the drain area in your basement floor. Please refer to Fig.22 & 23.
NOTE: When operating or draining water always protect carpeting or floors from possible water spillage.
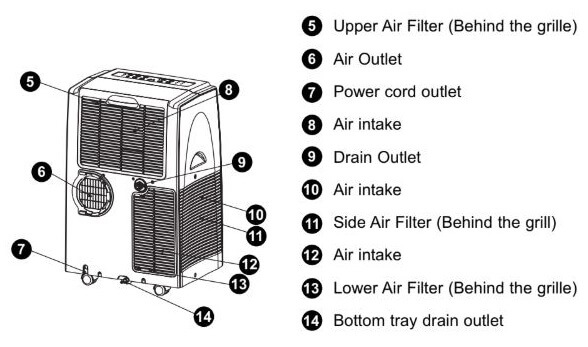
Air Filter
Clean the air filter at least once every two weeks to prevent inferior fan operation because of dust.
Removal: This unit has three filters. Take the upper filter out along the arrow direction (Fig.25), then take the filter down. Remove the lower filter and the side filter by loosening the screws, taking out the filters as shown in Fig.25.
Cleaning: Wash the air filter by immersing it gently in warm water (about 40°C / 104 °F) with a neutral detergent. Rinse the filter and dry it in a shady place.
Mounting: Install the upper air filter after cleaning ,then insert the side filter into the unit and install the lower filter by using the screws (see Fig.26).
Comments
Post a Comment